Monday, September 3, 2012

Wine Bottles Improve everything

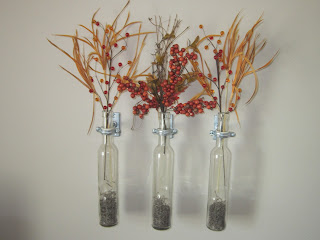
This weekend as seen in prior posts was very craft filled and fall inspired. This post is to show a simple wine bottle decoration that is good in any room and very versatile for the changing seasons. I of course made it with fall decorations but feel free to add your own touch. The best part of this decoration is the flexibility of options.


Now I cheated on this project a little and bought the bottles and clamps from ETSY. I had birthday money and didn't want to hassle with trying to put this piece together myself.  http://www.etsy.com/shop/GreatBottlesofFire is the vendor i bought the set from and it was at my doorstep a week after ordering.... However I know money can be an issue so I have the instructions on how to make them below with supplies you can purchase at your local hardware store. 
You will need (per vase):

- (1) Empty wine bottle of your choice
- (1) Top plate connector/ceiling flanges (3/8″ size)
- (1) 1″ split ring hanger
- (2) screws to fit and hold the top plate connector (you may also want drywall anchors if you are not mounting directly into studs or another material)
- (1) piece of 3/8″ threaded rod, cut into 2 1/2″ pieces.
- 1/2″ double sided foam mounting tape (optional – if your bottle’s neck is smaller than 1″, like ours were)
- Silk flowers of your choice.

1. With a hack saw, cut your threaded rod down to size. Ours were about 2 1/2″ long, as we didn’t want our bottles hanging out too far from the walls. If you are hanging multiple bottles, just be sure you cut your pieces to equal sizes.

2. Position the top-plate connector on your wall, and mark the holes where the screws will go. Pre-drill the holes, insert any necessary drywall anchors, and then attach the plate to the wall.
3. Screw in your cut rod pieces, and then your split ring hanger.
4. If your wine bottle has a narrow neck (the 1″ split ring is loose around it and doesn’t fit snugly), apply a layer or two (as needed) of foam mounting tape to the neck of the bottle where it will be held by the split ring. Remove the backing from the other side of the tape, position the bottle in the split ring, and tighten the screws to secure in place. Pop in your flowers and voila!

My bottles came with the foam mounting tape. I think it really makes a difference and causes less friction on the glass.  


The first step after everything is assembled is to screw them into the wall. Make sure you find studs because they can get very heavy depending on what you decide to put in them. Screw the plate into the wall without the wine glasses, and once they are in the spot you like you can screw the glasses on. I found it was easiest to put your filler in the bottles before they were mounted on the wall, so as you see here I have inserted some rustic moss... a common theme in my decorations especially for fall. You can add rocks, marbles, fake snow, glitter, the options are endless, and thats what makes this project fun. 


These are the pieces I decided to go with for my fall look. All three were purchased at Hobby Lobby for under 3 dollars, but you can get them at any craft store this time of year, and sometimes even the dollar store will surprise you. 


I used the straw pieces for the back because they were more full and create more depth. Whatever you decide to put in the bottles you should put the larger one in the back for a more dramatic look   


Next I added the second layer.  In this case it was two beaded vines. They contrast nicely with the straw and the little bits of red look great. 


Lastly add the last piece in the middle bottle and voila! your piece is finished! You can make all the bottles match, have them all different, or just change the middle like I did in this picture.  I personally like how it looks with the middle one different that the two outer bottles. This piece is perfect for living rooms, breakfast nooks, or bedrooms because as mentioned there are so many endless options for this. I plan on adding some pine holly and fake snow for Christmas time! 


This is what I have for off seasons, the feathers and flowers were both purchased at Michaels.  


Posted by EE
Red Velvet Cheesecake Cake


Red Velvet Cake Cheesecake 


Sometimes you just need to say Screw the diet and eat something delicious! This Red Velvet Cake Cheesecake is almost exactly like the one sold at the Cheesecake factory for over 50 dollars made for half the price!  Now you can go even easier and use the red velvet cake mix, but below are the instructions to make the entire cake from scratch.

Red Velvet Cake Cheesecake
9 inch - Serves 12

Ingredients for Cake:
1 teaspoon vanilla
1 cup buttermilk
1 teaspoon salt 
2 1/2 cup cake flour 
1/2 lb (2 sticks) butter 
2 ounces red food coloring 
2 tablespoons cocoa 
2 cups sugar 
2 eggs 
1/2 teaspoon baking soda 
1 tablespoon vinegar 


 Directions:
Set a rack in the middle of the oven and preheat 350 degrees. Grease the two 9-inch cake pans with soft butter and line with a disk of parchment paper on the bottom. It's okay for the paper to be slightly smaller than the botom of the pan, but if it is larger it may tear the side of the cake.

Beat eggs; add sugar.  Mix cocoa and food coloring.  Add butter and egg mixture; mix well.  Sift together flour and salt.  Add to creamed mixture alternately with buttermilk.  Blend in vanilla.  In a small bowl, combine soda and vinegar and add to mixture.  Bake for 20 to 25 minutes, or until tests done.  Set aside to cool for 30 mins. Double wrap the cakes in plastic wrap, and store them in the fridge for 30 mins.


White Chocolate Cheesecake

Ingredients:
2 oz white chocolate, chopped
16 oz cream cheese, at room temperature ( 2 packages)
1/2 cup + 2 Tbsp sugar
1 tbsp flour
2 eggs at room temperature
1 tsp vanilla extract
1 tbsp heavy cream


Directions:
Preheat the oven to 350 degrees F. Line a 9-inch springform pan with parchment paper on the bottom.
Melt the white chocolate and set aside to cool slightly.

In a large bowl, using an electronic mixer, mix the cream cheese on low speed until creamy. add the sugar and mix slowly until smooth. on low speed, mix in the flour. turn off the mixer and scrape down the bowl and beater with a rubber spatula. Add one egg at a time and mix until smooth. scrape down again. mix in the vanilla and cream until the mixture is smooth. Using a large spoon, stir in the melted white chocolate until incorporated.

Pour the batter into a parchment paper lined 9 inch spring form pan. Bake for about 30 minutes, or until the center is set when you shake the pan slightly. Allow to cool before removing from the spring form pan. Allow to cool completely before assembling with the red velvet cake. I actually put my cheesecake in the fridge for 30 mins and then in the freezer for 15 mins more.


Cream Cheese Frosting

Ingredients:
2 packages of cream cheese, room temperature
1 sticks of butter, at room temperature
2 tsp vanilla
3 cups of powdered sugar, plus more to taste


Directions:
Combine all ingredients in a large mixing bowl and beat with an electronic mixer until well combined. Add more powdered sugar to taste, if a more sweet frosting is preferred. Refrigerate for 5 mins. 


Now for the fun part... the Assembly
Put one of the cake layers rightside up on a cake cardboard or platter. 


Spoon a little frosting on the layer, using a medium offset spatula to spread it evenly and to the edge all around. 


Place your cheesecake straight out of the freezer onto your red cake layer and repeat the process of spreading frosting on the cheesecake using your offset spatual.  


Invert the second layer of the red velvet cake on the icing (the smooth bottom of the layer is now on top) and gently press the layer into the icing. Spread the entire outside of the cake with the remaining icing,smoothing it out as you go along. Use the palm of your hand to press the red cake crumbles all around the cake.  Keep the cake refrigerated until serving.


You will get rave reviews for serving this dessert and it's very easy. As mentioned earlier if tackling the Red Velvet cake seems like to big of an undertaking just go with the boxed cake mix either way it's simply delicious!

Posted by EE

Labor Day Blues

Today My husband was out all afternoon doing a Fantasy Football draft with his friends, so I thought it would be the perfect time to craft. I was looking for something to go in our bedroom that matched our decor, but haven't been able to find anything, so I made this awesome very affordable mason jar  to spruce up the room. An easy to follow Demo is below...


First of all you need the supplies.. Glitter spray, Mason Jars, and a newspaper for the extra splatter. I used the sports section because it's the most useless :) The mason jars I had lying around, but you can purchase them at any store for under a dollar or use any other glassware that you may have.


The glitter spray I used was Krylon Glitter Blast purchased from Hobby Lobby for 7.99 They always have 40 percent off coupons so don't buy it without one! They had many different colors but I used the  Sparkling Water as it went best with my bedroom color.


The first step is to create an area for your project. You don't need a large space but because the spray does splatter you don't want to do it in your house. I went outside and sprayed it in my yard but a garage or basement would work. Make sure you put newspaper under the jar.


The next step is all the fun! Spray liberally in a downward motion all over the jar. I started at the top and worked my way down. Its ok if it has drip marks they will fall down to the newspaper and you can cover them with a second coat. It is a warm day so it only took 25 minutes for the first coat to dry. I just spot sprayed for the second coat to even out the spots I missed the first time. Wait another 25-30 mins (maybe longer depending on the thickness of the coat and drying conditions) then flip upright and spray the rim.


I waited another hour before brining them in the house but Voila! in 2 hours time I have turned an ordinary mason jar into a beautiful piece of art. It's very affordable and really adds some character to the room.


Now I just have to figure out what to put in them! Enjoy!

Posted by EE

Sunday, September 2, 2012

Fall is around the corner!

Fall is my favorite time of year! I'm not trying to rush things but with the summer being so hot I am looking forward to some cool weather and pumpkin spice latte's from Starbucks :) Being that my husband and I just bought a house, we are lacking in the decorations department. Also because we are new homeowners it means we are on a tight budget. I am obsessed with Pinterest and always try to find different ideas on there for decorating.  Unfortunately, I often find they end up not being very cost effective or require a lot of supplies that I don't have. So that being said, I have come up with a few ideas that both look stunning and don't break the bank.


This is a beautiful decoration for the fall that cost less than 5 dollars to make. You can make anywhere from one to five depending on the space you are working with.  I made three, which you will see later on.


These are all the supplies needed for the project. One wine glass, One votive candle, Moss, Potpourri, and a miniature gourd. I had tons of wine glasses from my bachelorette party last year but you can buy them at any thrift store or Dollar Tree. To add more kick to the decoration, you can buy different size wine glasses to provide some depth. The gourd you see in the picture came in a pack of 5 at the Dollar Store along with all the other supplies.


The first step was to add the Potpourri. I used a pumpkin spice blend to go along with my fall theme because it had a lot of oranges and browns in it. When the glass is inverted this is the item that will be on the top, so if you don't like the Potpourri you could add the gourd, leaves, or anything else you may prefer.


The next step is adding the moss. It's quite messy so I recommend having a broom around :) You only need a little bit(I used a golf ball size amount for the picture seen). You don't have to use moss; you can use any kind of vase filler I just liked the rustic look of the moss for this project.


Last but not least, invert the glass and place the votive on top. I also used a pumpkin scented candle to go with the theme but I don't plan on burning them so it was more for the look. The moss can go everywhere when flipping, so make sure you have them on the surface you want before you flip them over. You can make as many as you want and as stated earlier different sizes looks great as well. You can make all the glasses the same or accent one like I did in this picture. I wanted to put some leaves on the table to finish the look but didn't have any on hand. The options are endless but the final result is great!

Also for something different but along the same lines, I made this decorative piece made with most of the same supplies. I just replaced the wine glass with a light bulb ornament purchased at Hobby Lobby for 75 cents and added the foliage to finish the piece. Both decorations are stunning in their own way and there are endless possibilities to shift the look. Have fun!


Posted by EE

Just an ordinary life..

Just an ordinary girl with an extreme passion for finding affordable ways to become a domestic goddess. Whether it's in home decorating, crafting, or once and a while an amazing recipe to knock your socks off, this blog is just created for my amusement and maybe once and a while for your benefit!

I can't believe that we have been married for almost a year! Time sure does fly by.